Mon cluster Kubernetes (GKE) avec Crossplane

Sommaire
La cible de cette documentation est de pouvoir créer et gérer un cluster GKE en utilisant Crossplane.
Crossplane exploite les principes de base de Kubernetes afin de fournir des ressources cloud et bien plus encore: une ** approche déclarative ** avec ** Drift Detections ** et ** réconciliations ** Utilisation de boucles de contrôle: Exploseding_head:.En d'autres termes, nous déclarons les ressources cloud que nous voulons et Crossplane garantit que l'état cible correspond à celui appliqué via l'API Kubernetes.
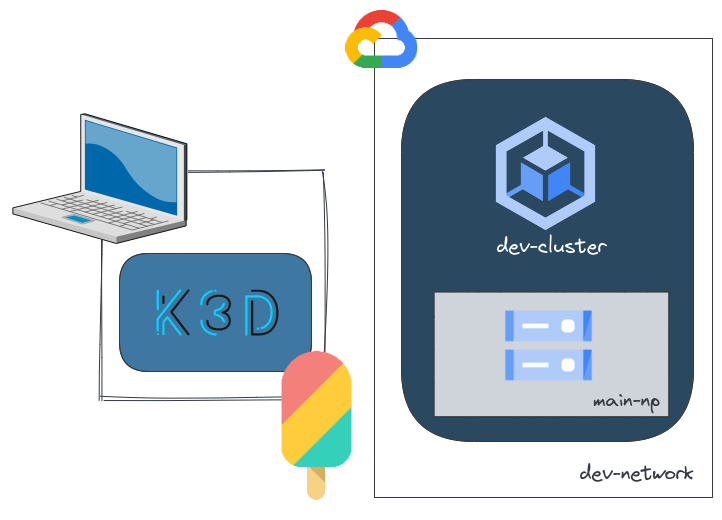
Voici les étapes que nous suivrons afin d'obtenir un cluster Kubernetes pour le développement et les cas d'utilisation des expérimentations.
🐳 Create the local k3d cluster for Crossplane's control plane
k3d est un cluster Kubernetes léger qui exploite K3S qui s'exécute dans notre ordinateur portable local.
Il existe plusieurs modèles de déploiement pour Crossplane, nous pourrions par exemple déployer le plan de contrôle sur un cluster de gestion sur Kubernetes ou un plan de contrôle par cluster Kubernetes.
Ici, j'ai choisi une méthode simple qui est bien pour un cas d'utilisation personnelle: une instance Kubernetes locale ** dans laquelle je vais déployer Crossplane.
Let's install k3d using asdf.
1asdf plugin-add k3d
2
3asdf install k3d $(asdf latest k3d)
4* Downloading k3d release 5.4.1...
5k3d 5.4.1 installation was successful!
Create a single node Kubernetes cluster.
1k3d cluster create crossplane
2...
3INFO[0043] You can now use it like this:
4kubectl cluster-info
5
6k3d cluster list
7crossplane   1/1       0/0      true
Check that the cluster is reachable using the kubectl CLI.
1kubectl cluster-info
2Kubernetes control plane is running at https://0.0.0.0:40643
3CoreDNS is running at https://0.0.0.0:40643/api/v1/namespaces/kube-system/services/kube-dns:dns/proxy
4Metrics-server is running at https://0.0.0.0:40643/api/v1/namespaces/kube-system/services/https:metrics-server:https/proxy
We only need a single node for our Crossplane use case.
1kubectl get nodes
2NAME                      STATUS   ROLES                  AGE   VERSION
3k3d-crossplane-server-0   Ready    control-plane,master   26h   v1.22.7+k3s1
☁️ Generate the Google Cloud service account
Store the downloaded crossplane.json credentials file in a safe place.
Create a service account
1GCP_PROJECT=<your_project>
2gcloud iam service-accounts create crossplane --display-name "Crossplane" --project=${GCP_PROJECT}
3Created service account [crossplane].
Assign the proper permissions to the service account.
- Compute Network Admin
- Kubernetes Engine Admin
- Service Account User
 1SA_EMAIL=$(gcloud iam service-accounts list --filter="email ~ ^crossplane" --format='value(email)')
 2
 3gcloud projects add-iam-policy-binding "${GCP_PROJECT}" --member=serviceAccount:"${SA_EMAIL}" \
 4--role=roles/container.admin --role=roles/compute.networkAdmin --role=roles/iam.serviceAccountUser
 5Updated IAM policy for project [<project>].
 6bindings:
 7- members:
 8  - serviceAccount:crossplane@<project>.iam.gserviceaccount.com
 9  role: roles/compute.networkAdmin
10- members:
11  - serviceAccount:crossplane@<project>.iam.gserviceaccount.com
12...
13version: 1
Download the service account key (json format)
1gcloud iam service-accounts keys create crossplane.json --iam-account ${SA_EMAIL}
2created key [ea2eb9ce2939127xxxxxxxxxx] of type [json] as [crossplane.json] for [crossplane@<project>.iam.gserviceaccount.com]
🚧 Deploy and configure Crossplane
Now that we have a credentials file for Google Cloud, we can deploy the Crossplane operator and configure the provider-gcp provider.
Most of the following steps are issued from the official documentation
We'll first use Helm in order to install the operator
 1helm repo add crossplane-master https://charts.crossplane.io/master/
 2"crossplane-master" has been added to your repositories
 3
 4helm repo update
 5...Successfully got an update from the "crossplane-master" chart repository
 6
 7helm install crossplane --namespace crossplane-system --create-namespace \
 8--version 1.18.1 crossplane-stable/crossplane
 9
10NAME: crossplane
11LAST DEPLOYED: Mon Jun  6 22:00:02 2022
12NAMESPACE: crossplane-system
13STATUS: deployed
14REVISION: 1
15TEST SUITE: None
16NOTES:
17Release: crossplane
18...
Check that the operator is running properly.
1kubectl get po -n crossplane-system
2NAME                                       READY   STATUS    RESTARTS   AGE
3crossplane-rbac-manager-54d96cd559-222hc   1/1     Running   0          3m37s
4crossplane-688c575476-lgklq                1/1     Running   0          3m37s
All the files used for the upcoming steps are stored within this blog repository. So you should clone and change the current directory:
1git clone https://github.com/Smana/smana.github.io.git
2
3cd smana.github.io/content/resources/crossplane_k3d
Now we'll configure Crossplane so that it will be able to create and manage GCP resources. This is done by configuring the provider provider-gcp as follows.
provider.yaml
1apiVersion: pkg.crossplane.io/v1
2kind: Provider
3metadata:
4  name: crossplane-provider-gcp
5spec:
6  package: crossplane/provider-gcp:v0.21.0
1kubectl apply -f provider.yaml
2provider.pkg.crossplane.io/crossplane-provider-gcp created
3
4kubectl get providers
5NAME                      INSTALLED   HEALTHY   PACKAGE                           AGE
6crossplane-provider-gcp   True        True      crossplane/provider-gcp:v0.21.0   10s
Create the Kubernetes secret that holds the GCP credentials file created above
1kubectl create secret generic gcp-creds -n crossplane-system --from-file=creds=./crossplane.json
2secret/gcp-creds created
Then we need to create a resource named ProviderConfig and reference the newly created secret.
provider-config.yaml
 1apiVersion: gcp.crossplane.io/v1beta1
 2kind: ProviderConfig
 3metadata:
 4  name: default
 5spec:
 6  projectID: ${GCP_PROJECT}
 7  credentials:
 8    source: Secret
 9    secretRef:
10      namespace: crossplane-system
11      name: gcp-creds
12      key: creds
1kubectl apply -f provider-config.yaml
2providerconfig.gcp.crossplane.io/default created
If the serviceaccount has the proper permissions we can create resources in GCP. In order to learn about all the available resources and parameters we can have a look to the provider's API reference.
The first resource we'll create is the network that will host our Kubernetes cluster.
network.yaml
 1apiVersion: compute.gcp.crossplane.io/v1beta1
 2kind: Network
 3metadata:
 4  name: dev-network
 5  labels:
 6    service: vpc
 7    creation: crossplane
 8spec:
 9  forProvider:
10    autoCreateSubnetworks: false
11    description: "Network used for experimentations and POCs"
12    routingConfig:
13      routingMode: REGIONAL
1kubectl get network
2NAME          READY   SYNCED
3dev-network   True    True
You can even get more details by describing this resource. For instance if something fails you would see the message returned by the Cloud provider in the events.
 1kubectl describe network dev-network | grep -A 20 '^Status:'
 2Status:
 3  At Provider:
 4    Creation Timestamp:  2022-06-28T09:45:30.703-07:00
 5    Id:                  3005424280727359173
 6    Self Link:           https://www.googleapis.com/compute/v1/projects/${GCP_PROJECT}/global/networks/dev-network
 7  Conditions:
 8    Last Transition Time:  2022-06-28T16:45:31Z
 9    Reason:                Available
10    Status:                True
11    Type:                  Ready
12    Last Transition Time:  2022-06-30T16:36:59Z
13    Reason:                ReconcileSuccess
14    Status:                True
15    Type:                  Synced
🚀 Create a GKE cluster
Everything is ready so that we can create our GKE cluster. Applying the file cluster.yaml will create a cluster and attach a node group to it.
cluster.yaml
 1---
 2apiVersion: container.gcp.crossplane.io/v1beta2
 3kind: Cluster
 4metadata:
 5  name: dev-cluster
 6spec:
 7  forProvider:
 8    description: "Kubernetes cluster for experimentations and POCs"
 9    initialClusterVersion: "1.24"
10    releaseChannel:
11      channel: "RAPID"
12    location: europe-west9-a
13    addonsConfig:
14      gcePersistentDiskCsiDriverConfig:
15        enabled: true
16      networkPolicyConfig:
17        disabled: false
18    networkRef:
19      name: dev-network
20    ipAllocationPolicy:
21      createSubnetwork: true
22      useIpAliases: true
23    defaultMaxPodsConstraint:
24      maxPodsPerNode: 110
25    networkPolicy:
26      enabled: false
27  writeConnectionSecretToRef:
28    namespace: default
29    name: gke-conn
30---
31apiVersion: container.gcp.crossplane.io/v1beta1
32kind: NodePool
33metadata:
34  name: main-np
35spec:
36  forProvider:
37    initialNodeCount: 1
38    autoscaling:
39      autoprovisioned: false
40      enabled: true
41      maxNodeCount: 4
42      minNodeCount: 1
43    clusterRef:
44      name: dev-cluster
45    config:
46      machineType: n2-standard-2
47      diskSizeGb: 120
48      diskType: pd-standard
49      imageType: cos_containerd
50      preemptible: true
51      labels:
52        environment: dev
53        managed-by: crossplane
54      oauthScopes:
55        - "https://www.googleapis.com/auth/devstorage.read_only"
56        - "https://www.googleapis.com/auth/logging.write"
57        - "https://www.googleapis.com/auth/monitoring"
58        - "https://www.googleapis.com/auth/servicecontrol"
59        - "https://www.googleapis.com/auth/service.management.readonly"
60        - "https://www.googleapis.com/auth/trace.append"
61      metadata:
62        disable-legacy-endpoints: "true"
63      shieldedInstanceConfig:
64        enableIntegrityMonitoring: true
65        enableSecureBoot: true
66    management:
67      autoRepair: true
68      autoUpgrade: true
69    maxPodsConstraint:
70      maxPodsPerNode: 60
71    locations:
72      - "europe-west9-a"
1kubectl apply -f cluster.yaml
2cluster.container.gcp.crossplane.io/dev-cluster created
3nodepool.container.gcp.crossplane.io/main-np created
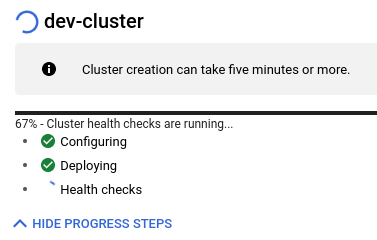
Note that it takes around 10 minutes for the Kubernetes API and the nodes to be available. The STATE will transition from PROVISIONING to RUNNING and when a change is being applied the cluster status is RECONCILING
1watch 'kubectl get cluster,nodepool'
2NAME                                              READY   SYNCED   STATE          ENDPOINT       LOCATION         AGE
3cluster.container.gcp.crossplane.io/dev-cluster   False   True     PROVISIONING   34.155.122.6   europe-west9-a   3m15s
4
5NAME                                           READY   SYNCED   STATE   CLUSTER-REF   AGE
6nodepool.container.gcp.crossplane.io/main-np   False   False            dev-cluster   3m15s

When the column READY switches to True you can download the cluster's credentials.
1kubectl get cluster
2NAME          READY   SYNCED   STATE         ENDPOINT         LOCATION         AGE
3dev-cluster   True    True     RECONCILING   34.42.42.42      europe-west9-a   6m23s
4
5gcloud container clusters get-credentials dev-cluster --zone europe-west9-a --project ${GCP_PROJECT}
6Fetching cluster endpoint and auth data.
7kubeconfig entry generated for dev-cluster.
For better readability you may want to rename the context id for the newly created cluster
1kubectl config rename-context gke_${GCP_PROJECT}_europe-west9-a_dev-cluster dev-cluster
2Context "gke_${GCP_PROJECT}_europe-west9-a_dev-cluster" renamed to "dev-cluster".
3
4kubectl config get-contexts
5CURRENT   NAME             CLUSTER                                                       AUTHINFO                                                      NAMESPACE
6*         dev-cluster      gke_cloud-native-computing-paris_europe-west9-a_dev-cluster   gke_cloud-native-computing-paris_europe-west9-a_dev-cluster
7          k3d-crossplane   k3d-crossplane                                                admin@k3d-crossplane
Check that you can call our brand new GKE API
1kubectl get nodes
2NAME                                    STATUS   ROLES    AGE   VERSION
3gke-dev-cluster-main-np-d0d978f9-5fc0   Ready    <none>   10m   v1.24.1-gke.1400
That's great 🎉 we know have a GKE cluster up and running.
💭 final thoughts
I've been using Crossplane for a few months now in a production environment.
Even if I'm conviced about the declarative approach using the Kubernetes API, we decided to move with caution with it. It clearly doesn't have Terraform's community and maturity.
We're still declaring our resources using the deletionPolicy: Orphan so that even if something goes wrong on the controller side the resource won't be deleted.
Furthermore we limited to a specific list of usual AWS resources requested by our developers. Nevertheless our target has always been to empower developers and we had really positive feedback from them. That's the best indicator for us. As the project matures, we'll move more and more resources from Terraform to Crossplane.
IMHO the key success of Crossplane depends on the providers maintenance and evolution. The Cloud providers interest and involvement is really important.
In our next article we'll see how to use a GitOps engine to run all the above steps.