Agentic Coding: concepts and hands-on Platform Engineering use cases
Overview
We can all see it — AI is shaking things up in a major way. The field is evolving so fast that keeping up with every new development is nearly impossible. As for measuring the impact on our daily lives and how we work, it's still too early to tell. One thing is certain though: in tech, it's a revolution!
In this post, I'll walk you through a practical application in Platform Engineering, exploring how a coding agent can help with common tasks in our field.
Most importantly, I'll try to demonstrate through concrete examples that this new way of working truly boosts our productivity. Really!
🎯 Goals of this article
- Understand what a coding agent is
- Discover the key concepts: tokens, MCPs, skills, agents
- Hands-on use cases in Platform Engineering
- Thoughts on limitations, pitfalls to avoid, and alternatives
- For tips and workflows I've picked up along the way, check the dedicated article
 | The examples below come from my work on the Cloud Native Ref repository. It's a full-fledged platform combining EKS, Cilium, VictoriaMetrics, Crossplane, Flux and many other tools. |
If you already know the basics of coding agents, tokens and MCPs, jump straight to the hands-on Platform Engineering use cases.
🧠 Why Coding Agents?
How an agent works
You probably already use ChatGPT, LeChat or Gemini to ask questions. That's great, but it's essentially one-shot: you ask a question, and you get an answer whose relevance depends on the quality of your prompt.
A coding agent works differently. It runs tools in a loop to achieve a goal. This is called an agentic loop.
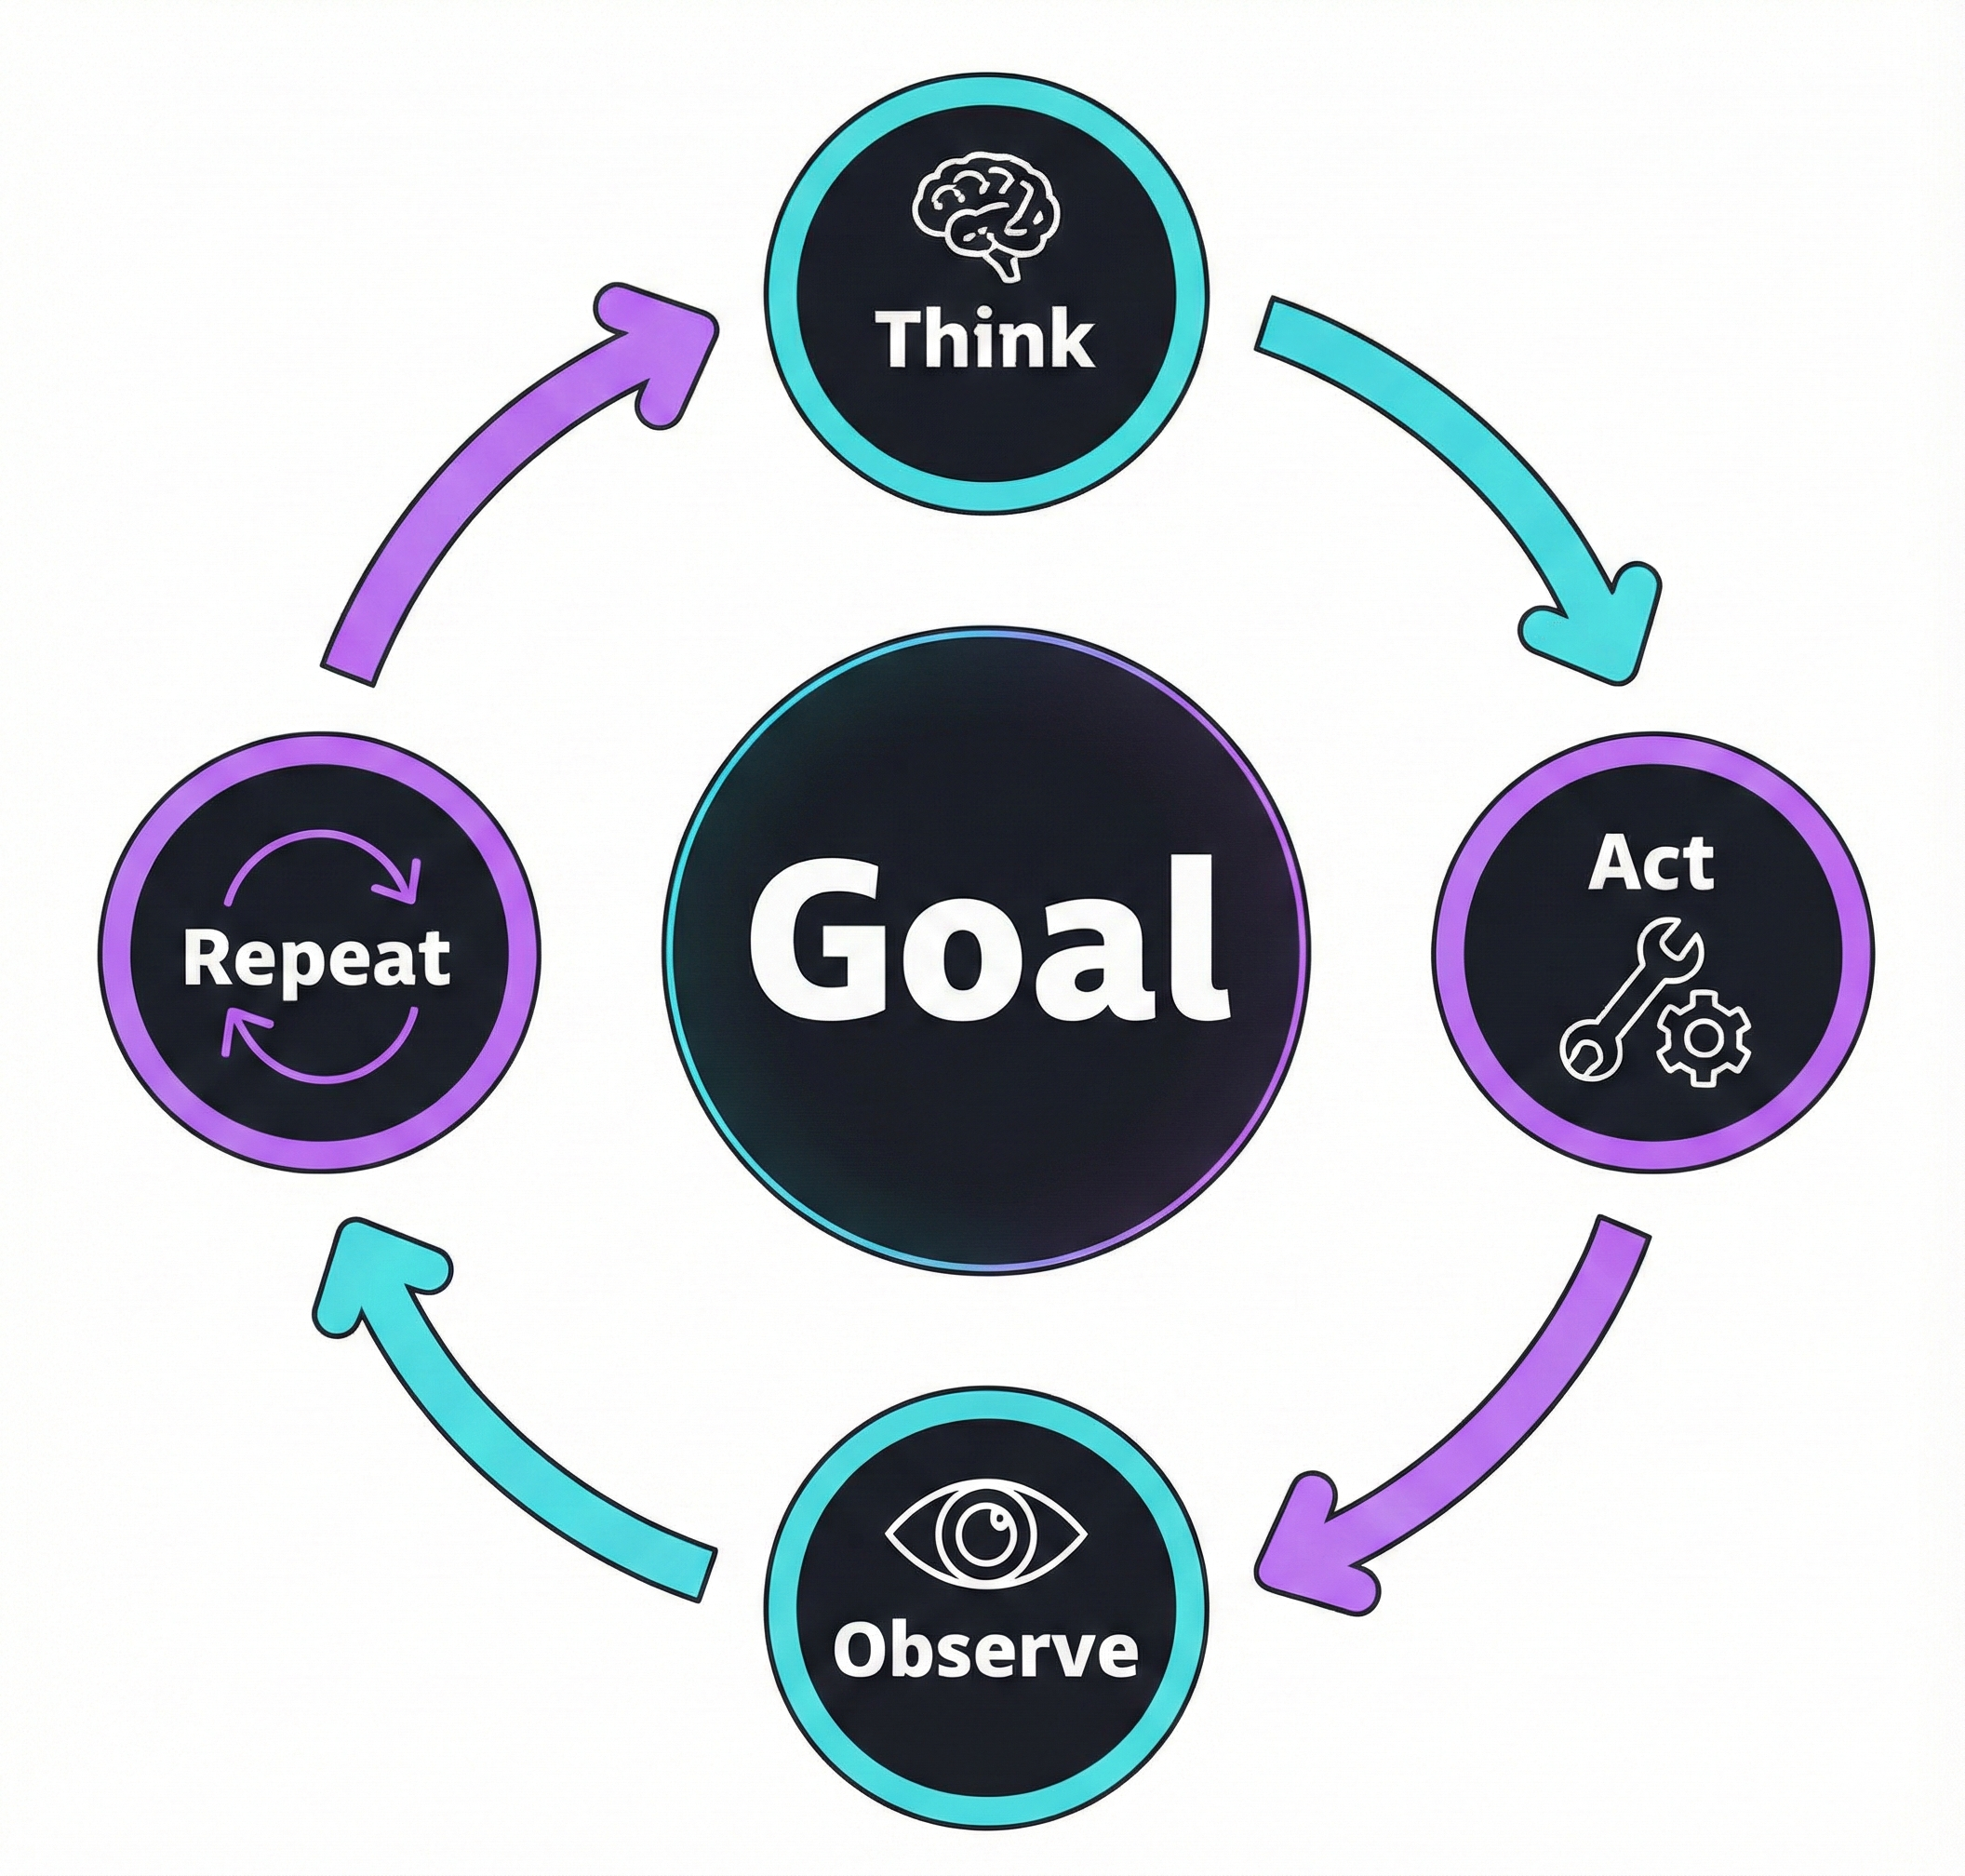
The cycle is simple: reason → act → observe → repeat. The agent calls a tool, analyzes the result, then decides on the next action. That's why it needs access to the output of each action — a compilation error, a failing test, an unexpected result. This ability to react and iterate autonomously on our local environment is what sets it apart from a simple chatbot.
A coding agent combines several components:
- LLM: The "brain" that reasons (Claude Opus 4.6, Gemini 3 Pro, Devstral 2...)
- Tools: Available actions (read/write files, execute commands, search the web...)
- Memory: Preserved context (
CLAUDE.md,AGENTS.md,GEMINI.md... depending on the tool, plus conversation history) - Planning: The ability to break down a complex task into sub-steps
Choosing the right model — hard to keep up 🤯
New models and versions appear at a breakneck pace. However, you need to be careful when choosing a model because effectiveness (code quality, hallucinations, up-to-date context) can vary drastically.
The SWE-bench Verified benchmark has become the reference for evaluating model capabilities in software development. It measures the ability to solve real bugs from GitHub repositories and helps guide our choices.
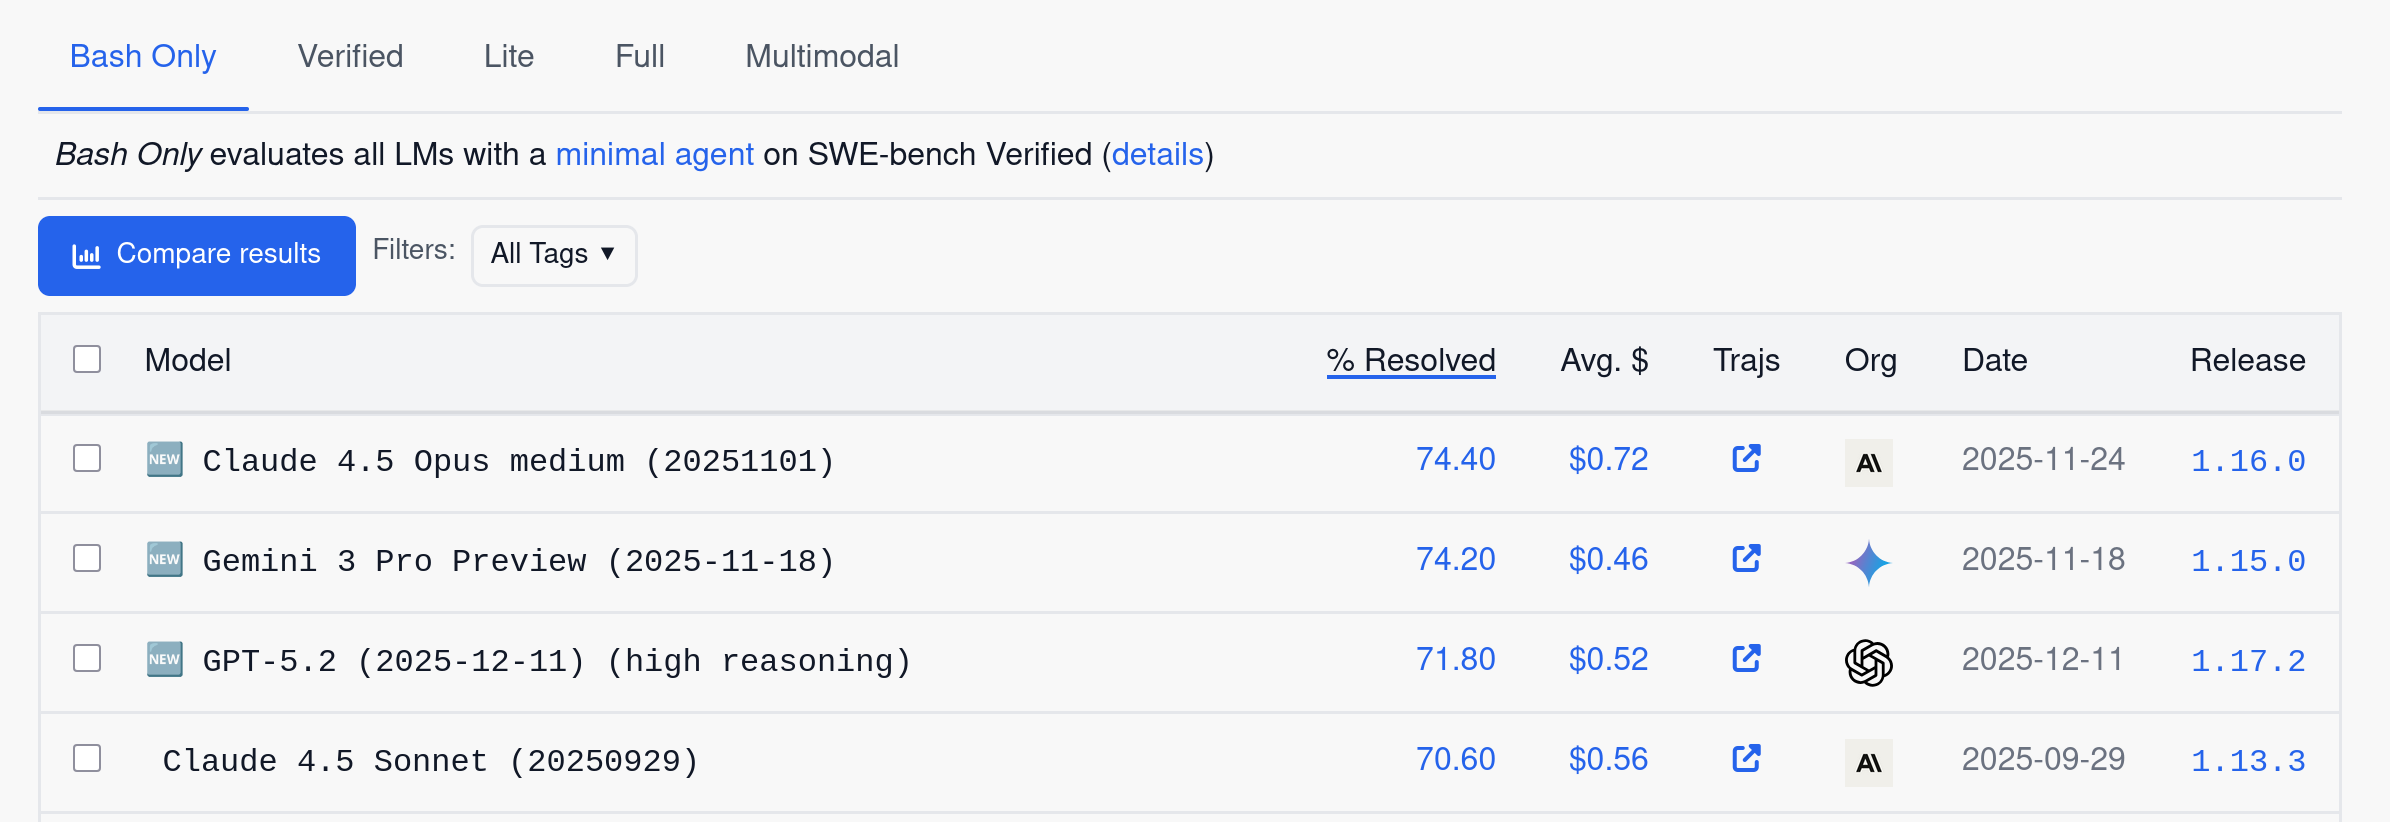
Check vals.ai for the latest independent results. At the time of writing, Claude Opus 4.6 leads with 79.2%, closely followed by Gemini 3 Flash (76.2%) and GPT-5.2 (75.4%).
In practice, today's top models are all capable enough for most Platform Engineering tasks.
Boris Cherny, creator of Claude Code, shared his take on model selection (about Opus 4.5 — the reasoning still holds):
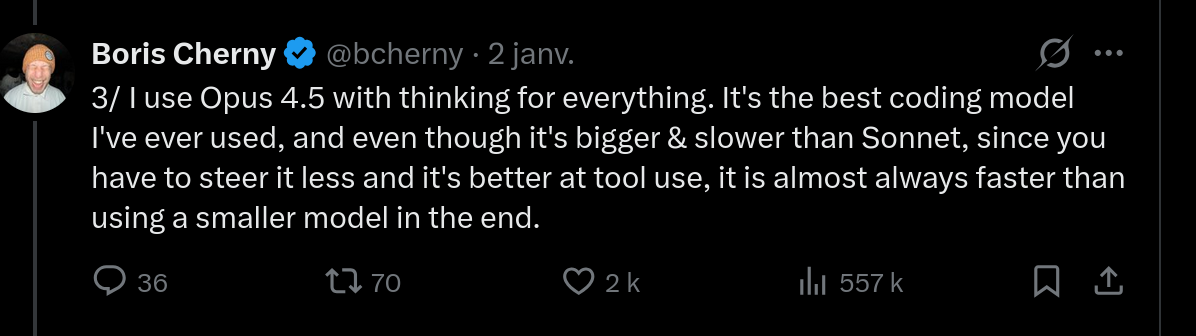
My experience aligns: with a more capable model, you spend less time rephrasing and correcting, which more than compensates for the extra latency.
Why Claude Code?
There are many coding agent options out there. Here are a few examples:
| Tool | Type | Strengths |
|---|---|---|
| Claude Code | Terminal | 200K context (1M in beta), high SWE-bench score, hooks & MCP |
| opencode | Terminal | Open source, multi-provider, local models (Ollama) |
| Cursor | IDE | Visual workflow, Composer mode |
| Antigravity | IDE | Parallel agents, Manager view |
Other notable alternatives (non-exhaustive): Gemini CLI, Mistral Vibe, GitHub Copilot...
I started with Cursor, then switched to Claude Code — probably because of my sysadmin background and natural affinity for the terminal. While others prefer working exclusively in their IDE, I feel more at home with a CLI.
📚 Essential Claude Code concepts
This section cuts straight to the point: tokens, MCPs, Skills, and Tasks. I'll skip the initial setup (the official docs cover that well) and subagents — that's internal plumbing; what matters is what you can build with them. Most of these concepts also apply to other coding agents.
Tokens and context window
The essentials about tokens
A token is the basic unit the model processes — roughly 4 characters in English, 2-3 in French. Why does this matter? Because everything costs tokens: input, output, and context.
The context window (200K tokens for Claude, up to 1M in beta) represents the model's "working memory". The /context command lets you see how this space is used:
1/context
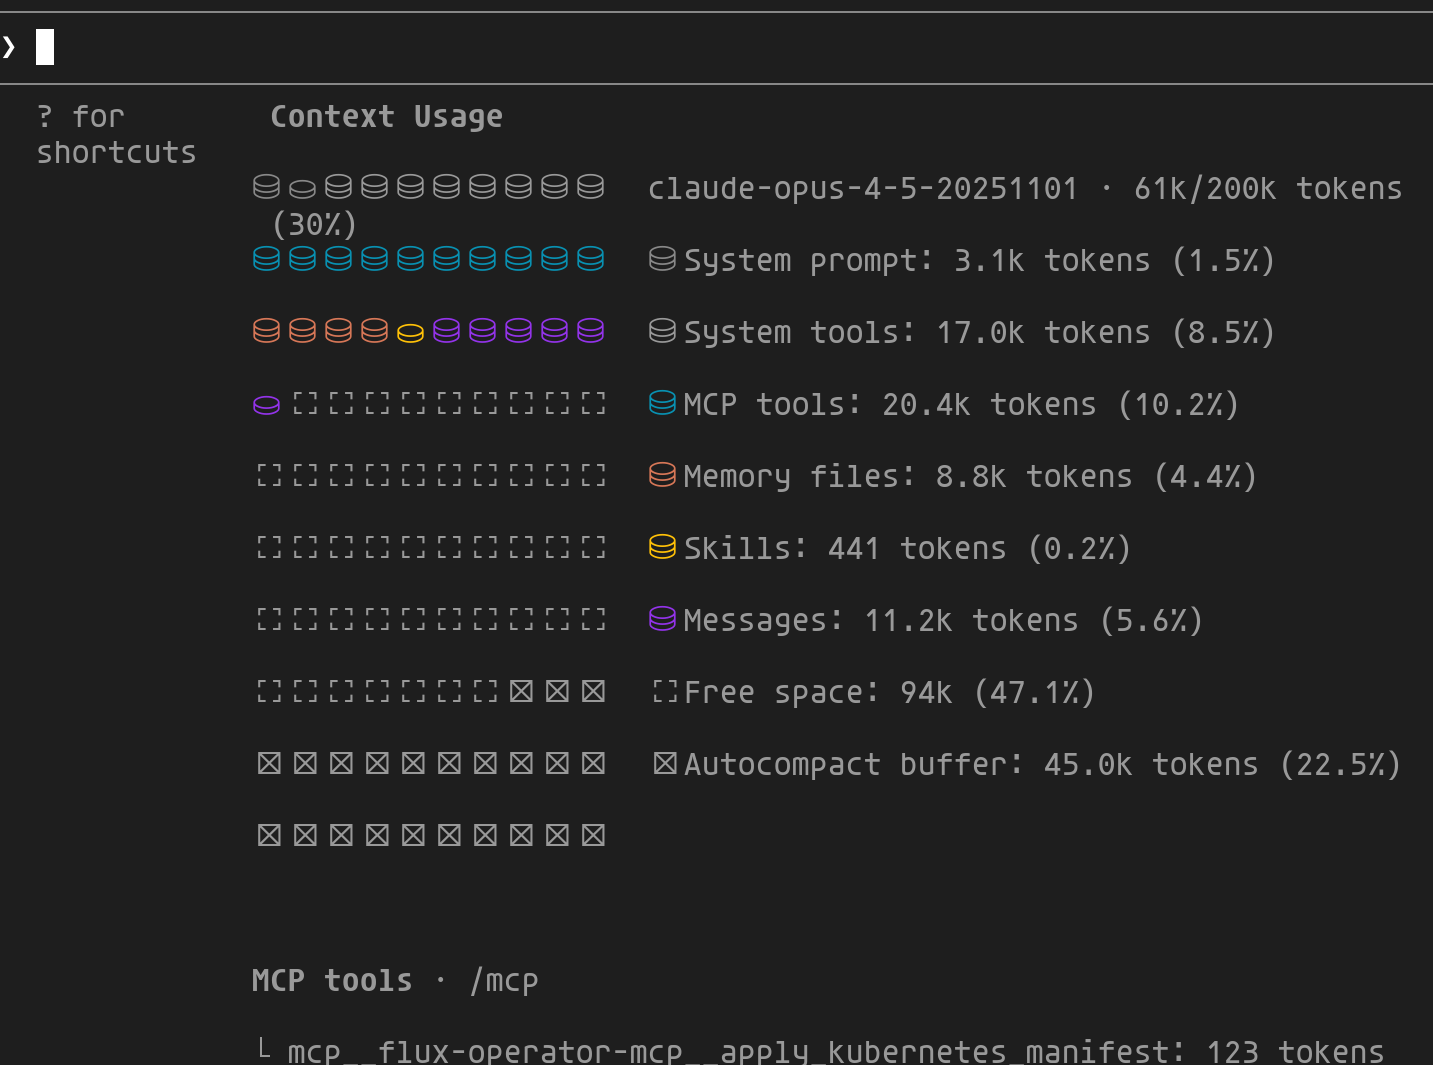
This view breaks down context usage across different components:
- System prompt/tools: Fixed cost of Claude Code (~10%)
- MCP tools: Definitions of enabled MCPs
- Memory files:
CLAUDE.md,AGENTS.md... - Messages: Conversation history
- Autocompact buffer: Reserved for automatic compression
- Free space: Available space to continue
Once the limit is reached, the oldest information is simply forgotten. Fortunately, Claude Code has an auto-compaction mechanism: as the conversation approaches 200K tokens, it intelligently compresses the history while retaining important decisions and discarding verbose exchanges. This lets you work through long sessions without losing the thread — but frequent compaction degrades context quality. That's why it's worth using /clear between distinct tasks. |  |
MCPs: a universal language
The Model Context Protocol (MCP) is an open standard created by Anthropic that allows AI agents to connect to external data sources and tools in a standardized way.
In December 2025, Anthropic handed MCP over to the Linux Foundation through the Agentic AI Foundation. OpenAI, Google, Microsoft and AWS are among the founding members.
There are many MCP servers available. Here are the ones I use regularly to interact with my platform — configuration, troubleshooting, analysis:
| MCP | What it does | Concrete example |
|---|---|---|
| context7 | Up-to-date docs for libs/frameworks | "Use context7 for the Cilium 1.18 docs" → avoids hallucinations on changed APIs |
| flux | Debug GitOps, reconciliation state | "Why is my HelmRelease stuck?" → Claude inspects Flux state directly |
| victoriametrics | PromQL queries, metric exploration | "What Karpenter metrics are available?" → lists and queries in real time |
| victorialogs | LogsQL queries, log analysis | "Find Crossplane errors from the last 2 hours" → root cause analysis |
| grafana | Dashboards, alerts, annotations | "Create a dashboard for these metrics" → generates and deploys the JSON |
| steampipe | SQL queries on cloud infra | "List public S3 buckets" → multi-cloud audit in one question |
MCPs can be configured globally (~/.claude/mcp.json) or per project (.mcp.json). I use context7 globally since I rely on it almost all the time, and the others at the repo level.
Skills: unlocking new powers
This is probably the feature that generates the most excitement in the community — and for a good reason, it really lets you extend the agent's capabilities! A skill is a Markdown file (.claude/skills/*/SKILL.md) that lets you inject project-specific conventions, patterns, and procedures.
In practice? You define once how to create a clean PR, how to validate a Crossplane composition, or how to debug a Cilium issue — and Claude applies those rules in every situation. It's encapsulated know-how that you can share with your team.
Two loading modes:
- Automatic: Claude analyzes the skill description and loads it when relevant
- Explicit: You invoke it directly via
/skill-name
The SKILL.md format introduced by Anthropic has become a de facto convention: GitHub Copilot, Google Antigravity, Cursor, OpenAI Codex and others adopt the same format (YAML frontmatter + Markdown). Only the directory changes (.claude/skills/, .github/skills/...). The skills you create are therefore reusable across tools.
Anatomy of a skill
A skill consists of a YAML frontmatter (metadata) and Markdown content (instructions). Here's the /create-pr skill from cloud-native-ref — it generates PRs with a structured description and Mermaid diagram:
 1<!-- .claude/skills/create-pr/SKILL.md -->
 2---
 3name: create-pr
 4description: Create Pull Requests with AI-generated descriptions and mermaid diagrams
 5allowed-tools: Bash(git:*), Bash(gh:*)
 6---
 7
 8## Usage
 9/create-pr [base-branch]       # New PR (default: main)
10/create-pr --update <number>   # Update an existing PR
11
12## Workflow
131. Gather: git log, git diff --stat, git diff (in parallel)
142. Detect: Change type (composition, infrastructure, security...)
153. Generate: Summary, Mermaid diagram, file table
164. Create: git push + gh pr create
| Field | Role |
|---|---|
name | Skill name and /create-pr command |
description | Helps Claude decide when to auto-load |
allowed-tools | Tools authorized without confirmation (git, gh) |
This pull request example shows how you can frame the agent's behavior to achieve the result you want — here, a structured PR with a diagram. This avoids iterating on the agent's proposals and helps you be more efficient.
Tasks: never losing track
Tasks (v2.1.16+) solve a real problem in autonomous workflows: how do you keep track of a complex task that spans over time?
Tasks replace the former "Todos" system and bring three key improvements: persistence across sessions, shared visibility between agents, and dependency tracking.
In practice, when Claude works on a long-running task, it can:
- Break down the work into Tasks with dependencies
- Delegate certain Tasks to the background
- Resume work after an interruption without losing context
Use /tasks to see the status of ongoing tasks. Handy for tracking where Claude is on a complex workflow.
🚀 Hands-on Platform Engineering/SRE use cases
Enough theory! Let's get to what really matters: how Claude Code can help us day to day. I'll share two detailed, concrete use cases that showcase the power of MCPs and the Claude workflow.
🔍 Full Karpenter observability with MCPs
This case perfectly illustrates the power of the agentic loop introduced earlier. Thanks to MCPs, Claude has full context about my environment (metrics, logs, up-to-date documentation, cluster state) and can iterate autonomously: create resources, deploy them, visually validate the result, then correct if needed.
The prompt
Prompt structure is essential for guiding the agent effectively. A well-organized prompt — with context, goal, steps and constraints — helps Claude understand not only what to do, but also how to do it. The Anthropic prompt engineering guide details these best practices.
Here's the prompt used for this task:
 1## Context
 2I manage a Kubernetes cluster with Karpenter for autoscaling.
 3Available MCPs: grafana, victoriametrics, victorialogs, context7, chrome.
 4
 5## Goal
 6Create a complete observability system for Karpenter: alerts + unified dashboard.
 7
 8## Steps
 91. **Documentation**: Via context7, fetch the latest Grafana docs
10   (alerting, dashboards) and Victoria datasources
112. **Alerts**: Create alerts for:
12    - Node provisioning errors
13    - AWS API call failures
14    - Quota exceeded
153. **Dashboard**: Create a unified Grafana dashboard integrating:
16    - Metrics (provisioning time, costs, capacity)
17    - Karpenter error logs
18    - Kubernetes events related to nodes
194. **Validation**: Deploy via kubectl, then visually validate with
20   the grafana and chrome MCPs
215. **Finalization**: If the rendering looks good, apply via the
22   Grafana operator, commit and create the PR
23
24## Constraints
25- Use recent Grafana features (v11+)
26- Follow best practices: dashboard variables, annotations,
27  progressive alert thresholds
Step 1: Planning and decomposition
Claude analyzes the prompt and automatically generates a structured plan broken into sub-tasks. This decomposition lets you track progress and ensures each step is completed before moving to the next.
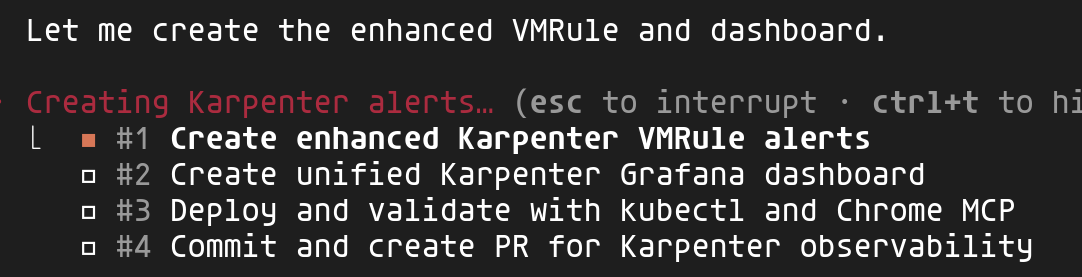
Here you can see the 4 identified tasks: create VMRule alerts, build the unified dashboard, validate with kubectl and Chrome, then finalize with commit and PR.
Step 2: Leveraging MCPs for context
This is where the power of MCPs becomes apparent. Claude uses several simultaneously to gather full context:
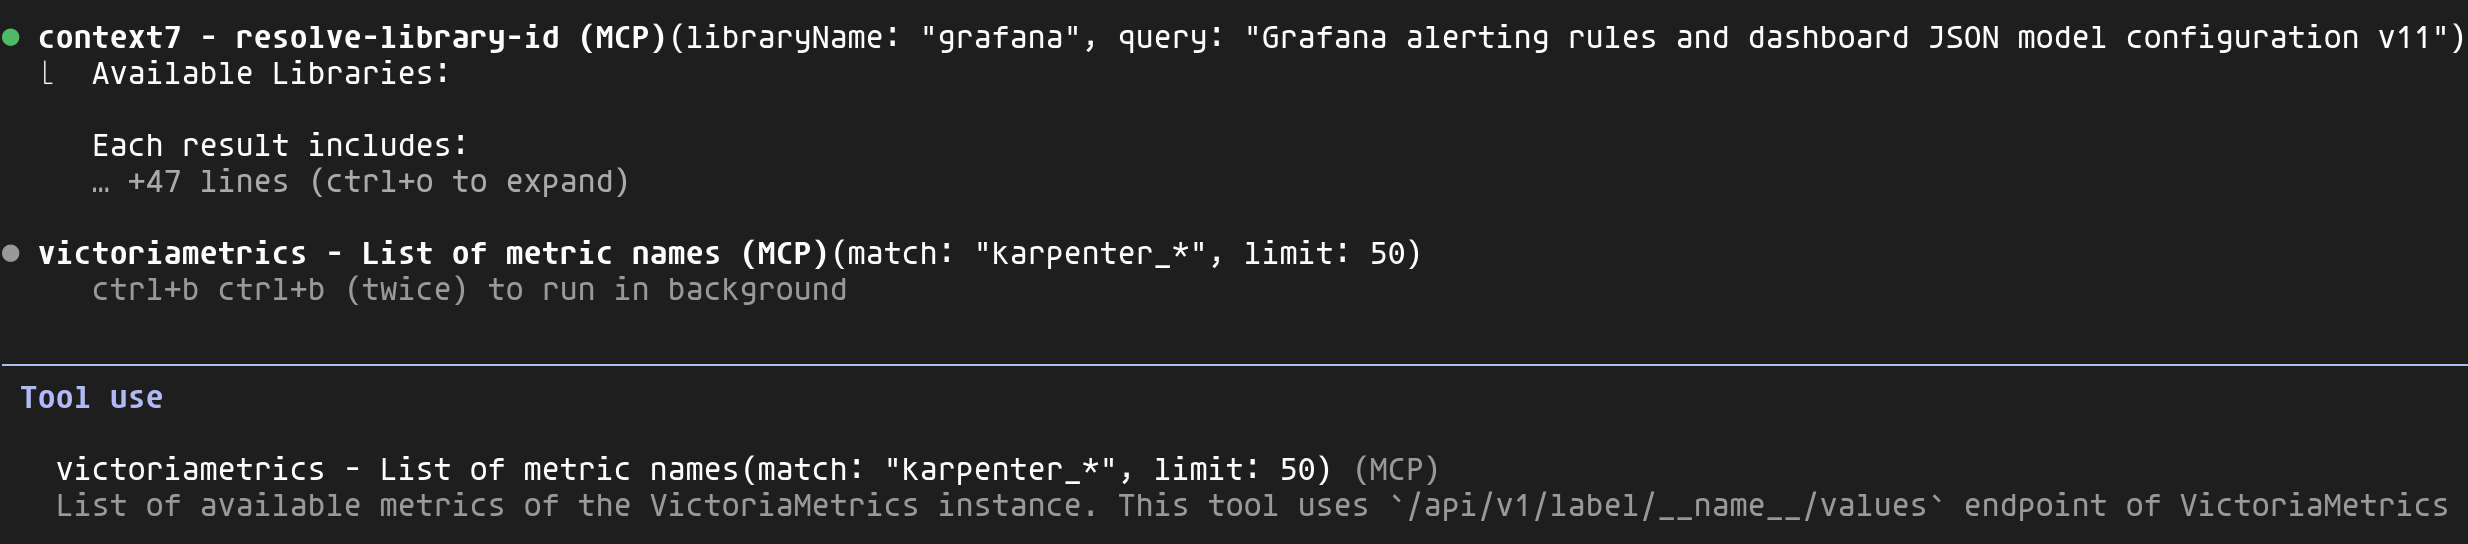
- context7: Retrieves Grafana v11+ documentation for alerting rules and dashboard JSON format
- victoriametrics: Lists all
karpenter_*metrics available in my cluster - victorialogs: Analyzes Karpenter logs to identify scaling events, provisioning errors and behavioral patterns
This combination allows Claude to generate code tailored to my actual environment rather than generic, potentially outdated examples.
Step 3: Visual validation with Chrome MCP
Once the dashboard is deployed via kubectl, Claude uses the Chrome MCP to open Grafana and visually validate the rendering. It can verify that panels display correctly, that queries return data, and adjust if necessary.
This is a concrete example of a feedback loop: Claude observes the results of its actions and can iterate until the desired outcome is achieved.
Result: complete observability
At the end of this workflow, Claude created a complete PR: 12 VMRule alerts (provisioning, AWS API, quotas, Spot interruptions) and a unified Grafana dashboard combining metrics, logs and Kubernetes events.
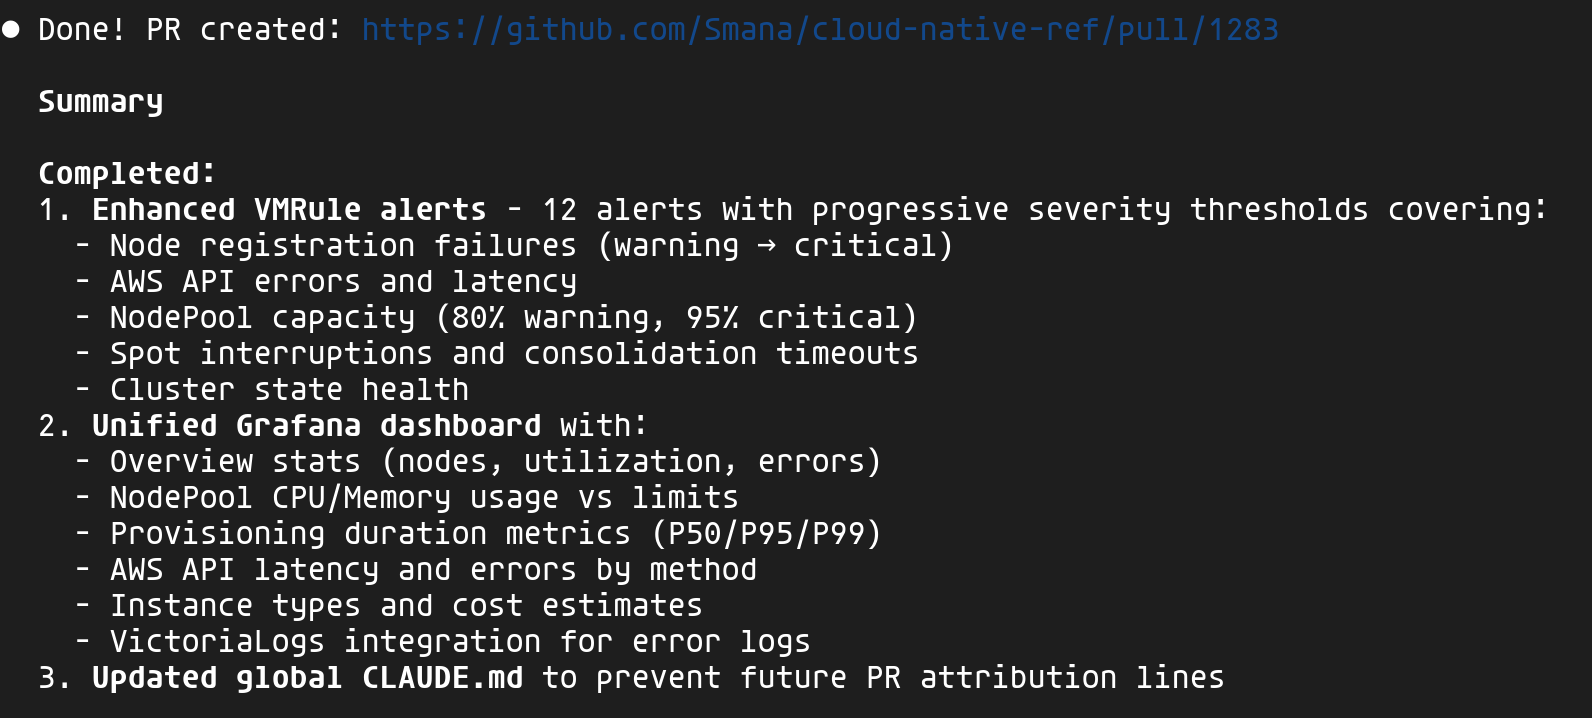
The ability to interact with my platform, identify errors and inconsistencies, then make adjustments automatically really blew me away 🤩. Rather than parsing Grafana JSON or listing metrics and logs through the various VictoriaMetrics UIs, I define my goal and the agent takes care of reaching it while consulting up-to-date documentation. A significant productivity boost!
🏗️ The spec as source of truth — building a new self-service capability
I've discussed in several previous articles the value of Crossplane for providing the right level of abstraction to platform users. This second use case puts that approach into practice: creating a Crossplane composition with the agent's help. This is one of the key principles of Platform Engineering — offering self-service tailored to the context while maintaining control over the underlying infrastructure.
Spec-Driven Development is a paradigm where specifications — not code — serve as the primary artifact. In the age of agentic AI, SDD provides the guardrails needed to prevent "Vibe Coding" (unstructured prompting) and ensure agents produce maintainable code.
For those steeped in Kubernetes, here's an analogy 😉: the spec defines the desired state, and once validated by a human, the AI agent behaves somewhat like a controller — iterating based on results (tests, validations) until that state is reached. The difference: the human stays in the loop (HITL) to validate the spec before the agent starts, and to review the final result.
Major frameworks in 2026:
| Framework | Key strength | Ideal use case |
|---|---|---|
| GitHub Spec Kit | Native GitHub/Copilot integration | Greenfield projects, structured workflow |
| BMAD | Multi-agent teams (PM, Architect, Dev) | Complex multi-repo systems |
| OpenSpec | Lightweight, change-focused | Brownfield projects, rapid iteration |
For cloud-native-ref, I created a variant inspired by GitHub Spec Kit that I'm evolving over time. I'll admit it's still quite experimental, but the results are already impressive.
🛡️ Platform Constitution — Non-negotiable principles are codified in a constitution: xplane-* prefix for IAM scoping, mandatory zero-trust networking, secrets via External Secrets only. Claude checks every spec and implementation against these rules.
👥 4 review personas — Each spec goes through a checklist that forces you to consider multiple angles:
| Persona | Focus |
|---|---|
| PM | Problem clarity, user stories aligned with real needs |
| Platform Engineer | API consistency, KCL patterns followed |
| Security | Zero-trust, least privilege, externalized secrets |
| SRE | Health probes, observability, failure modes |
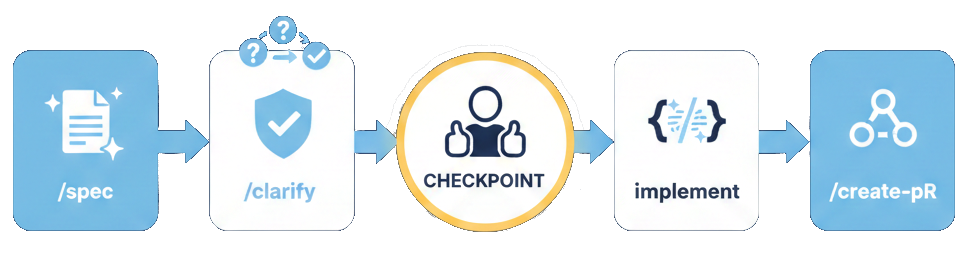
⚡ Claude Code Skills — The workflow is orchestrated by skills (see previous section) that automate each step:
| Skill | Action |
|---|---|
/spec | Creates the GitHub issue + pre-filled spec file |
/clarify | Resolves [NEEDS CLARIFICATION] items with structured options |
/validate | Checks completeness before implementation |
/create-pr | Creates the PR with automatic spec reference |
Why SDD for Platform Engineering?
Creating a Crossplane composition isn't just a script — it's designing an API for your users. Every decision has lasting implications:
| Decision | Impact |
|---|---|
| API structure (XRD) | Contract with product teams — hard to change after adoption |
| Resources created | Cloud costs, security surface, operational dependencies |
| Default values | What 80% of users will get without thinking about it |
| Integrations (IAM, Network, Secrets) | Compliance, isolation, auditability |
SDD forces you to think before coding and document decisions — exactly what you need for a platform API.
Our goal: building a Queue composition
The product team needs a queuing system for their applications. Depending on the context, they want to choose between:
- Kafka (via Strimzi): for cases requiring streaming, long retention, or replay
- AWS SQS: for simple, serverless cases with native AWS integration
Rather than asking them to configure Strimzi or SQS directly (dozens of parameters), we'll expose a simple, unified API.
Step 1: Create the spec with /spec 📝
The /spec skill is the workflow entry point. It automatically creates:
- A GitHub Issue with the
spec:draftlabel for tracking and discussions - A spec file in
docs/specs/pre-filled with the project template
1/spec composition "Add queuing composition supporting Strimzi (Kafka) or SQS"
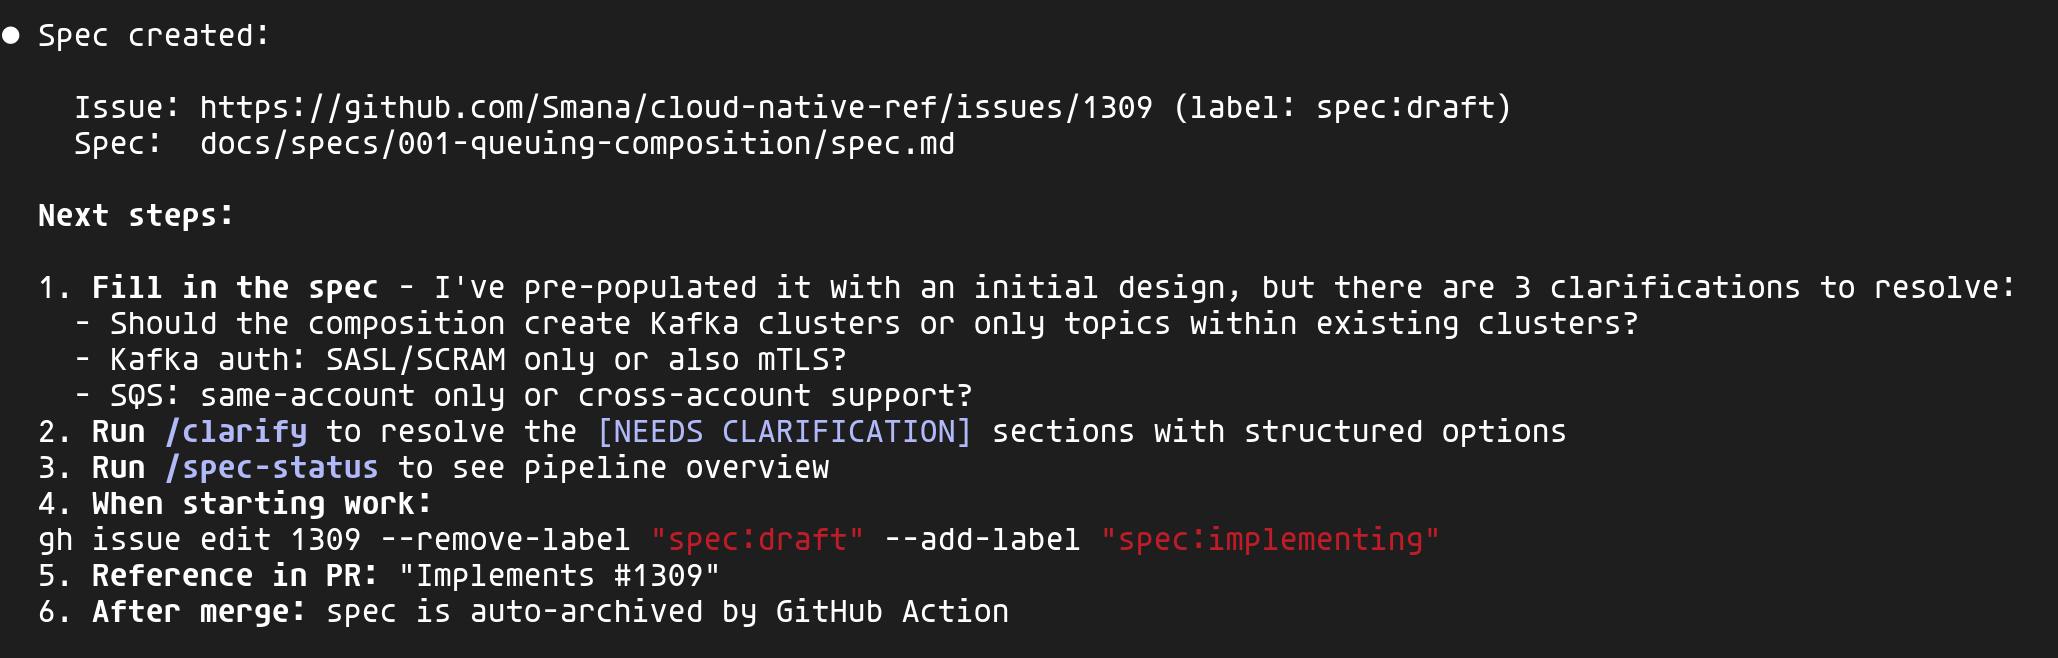
Claude analyzes the project context (existing compositions, constitution, ADRs) and pre-fills the spec with an initial design. It also identifies clarification points — here, 3 key questions about scope and authentication.
The GitHub issue serves as a centralized reference point — that's where discussions happen and decision history lives — while the spec file evolves with the detailed design.
Step 2: Clarify design choices with /clarify 🤔
The generated spec contains [NEEDS CLARIFICATION] markers for decisions Claude can't make on its own. The /clarify skill presents them as structured questions with options:

Each question proposes options analyzed from 4 perspectives (PM, Platform Engineer, Security, SRE) with a recommendation. You simply pick by navigating the proposed options.
Once all clarifications are resolved, Claude updates the spec with a decision summary:
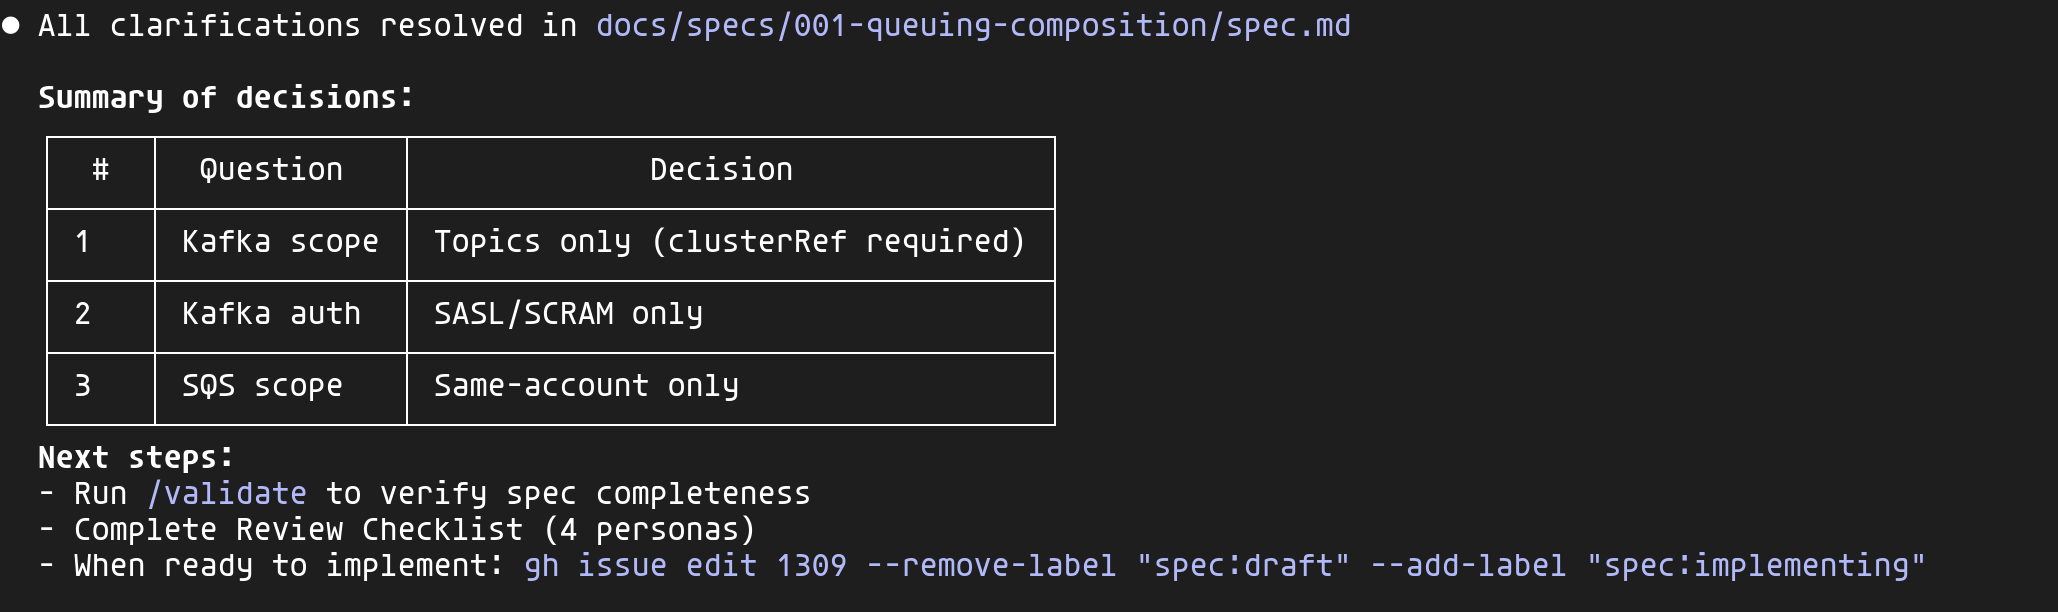
These decisions are documented in the spec — six months from now, when someone asks "why no mTLS?", the answer will be right there.
Step 3: Validate and implement ⚙️
Before starting implementation, the /validate skill checks the spec's completeness:
- All required sections are present
- All
[NEEDS CLARIFICATION]markers are resolved - The GitHub issue is linked
- The project constitution is referenced
Once validated, I can start the implementation. Claude enters plan mode and launches exploration agents in parallel to understand existing patterns:
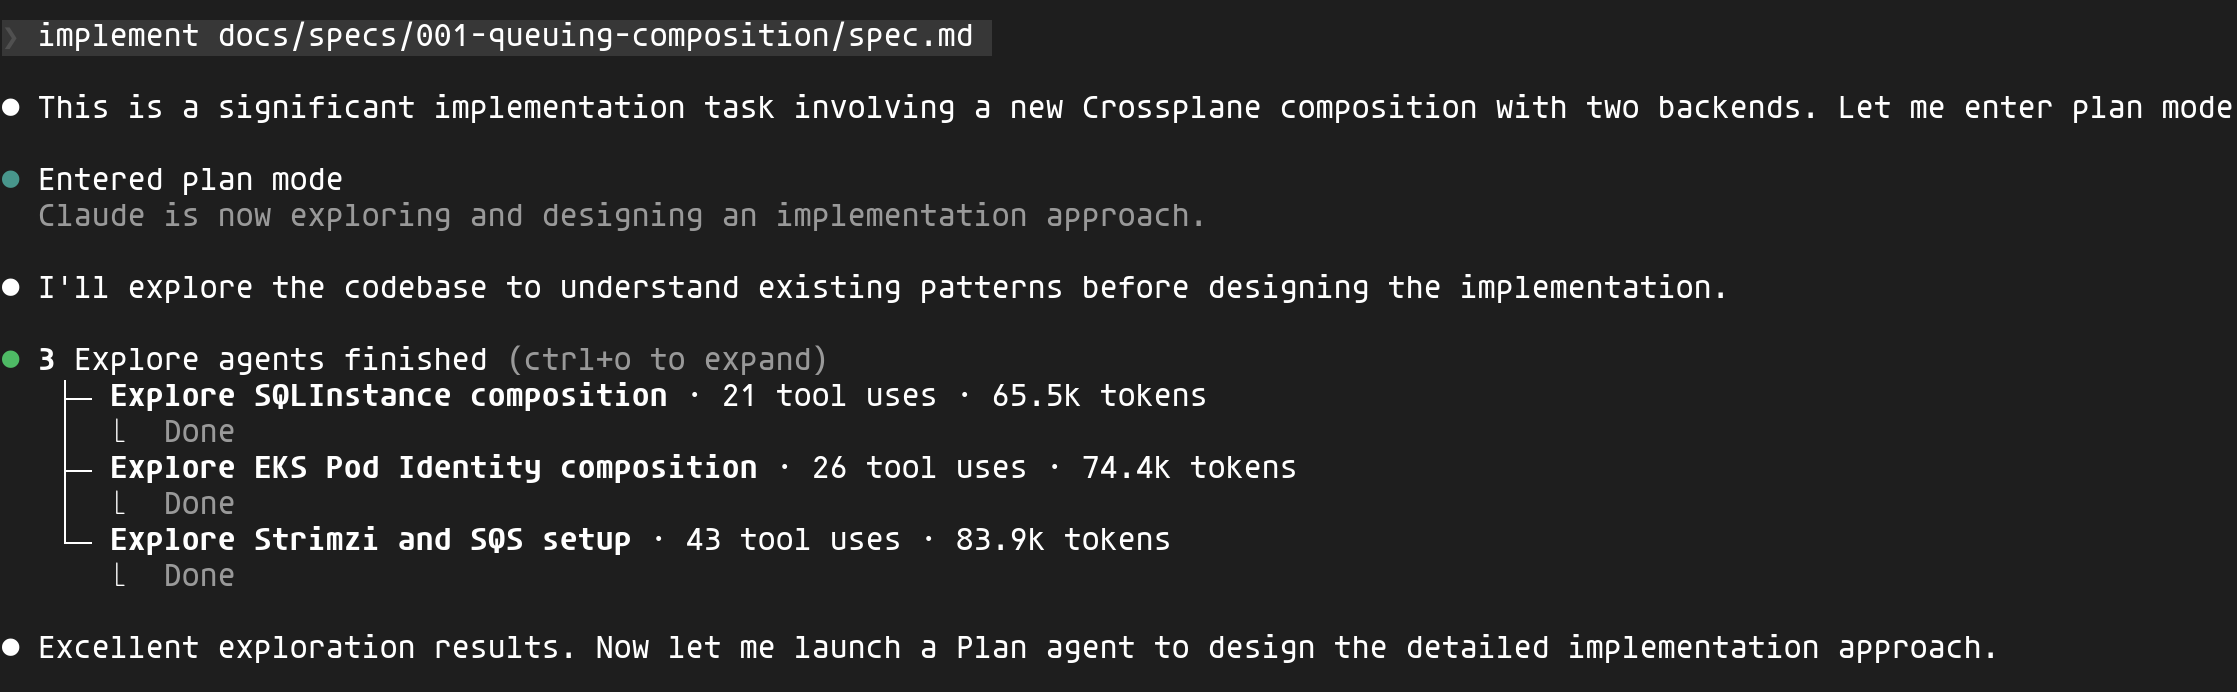
Claude explores existing compositions (SQLInstance, EKS Pod Identity, the Strimzi configuration) to understand the project's conventions before writing a single line of code.
The implementation generates the appropriate resources based on the chosen backend:
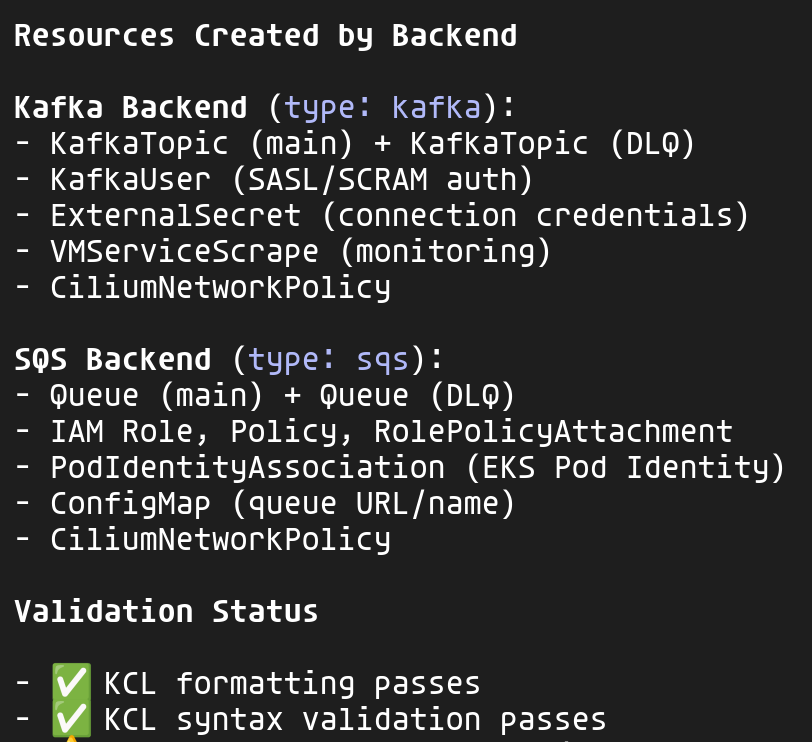
For each backend, the composition creates the necessary resources while following the project's conventions:
xplane-*prefix for all resources (IAM convention)CiliumNetworkPolicyfor zero-trust networkingExternalSecretfor credentials (no hardcoded secrets)VMServiceScrapefor observability
Step 4: Final validation 🛂
The /validate skill checks not only the spec but also the implementation:
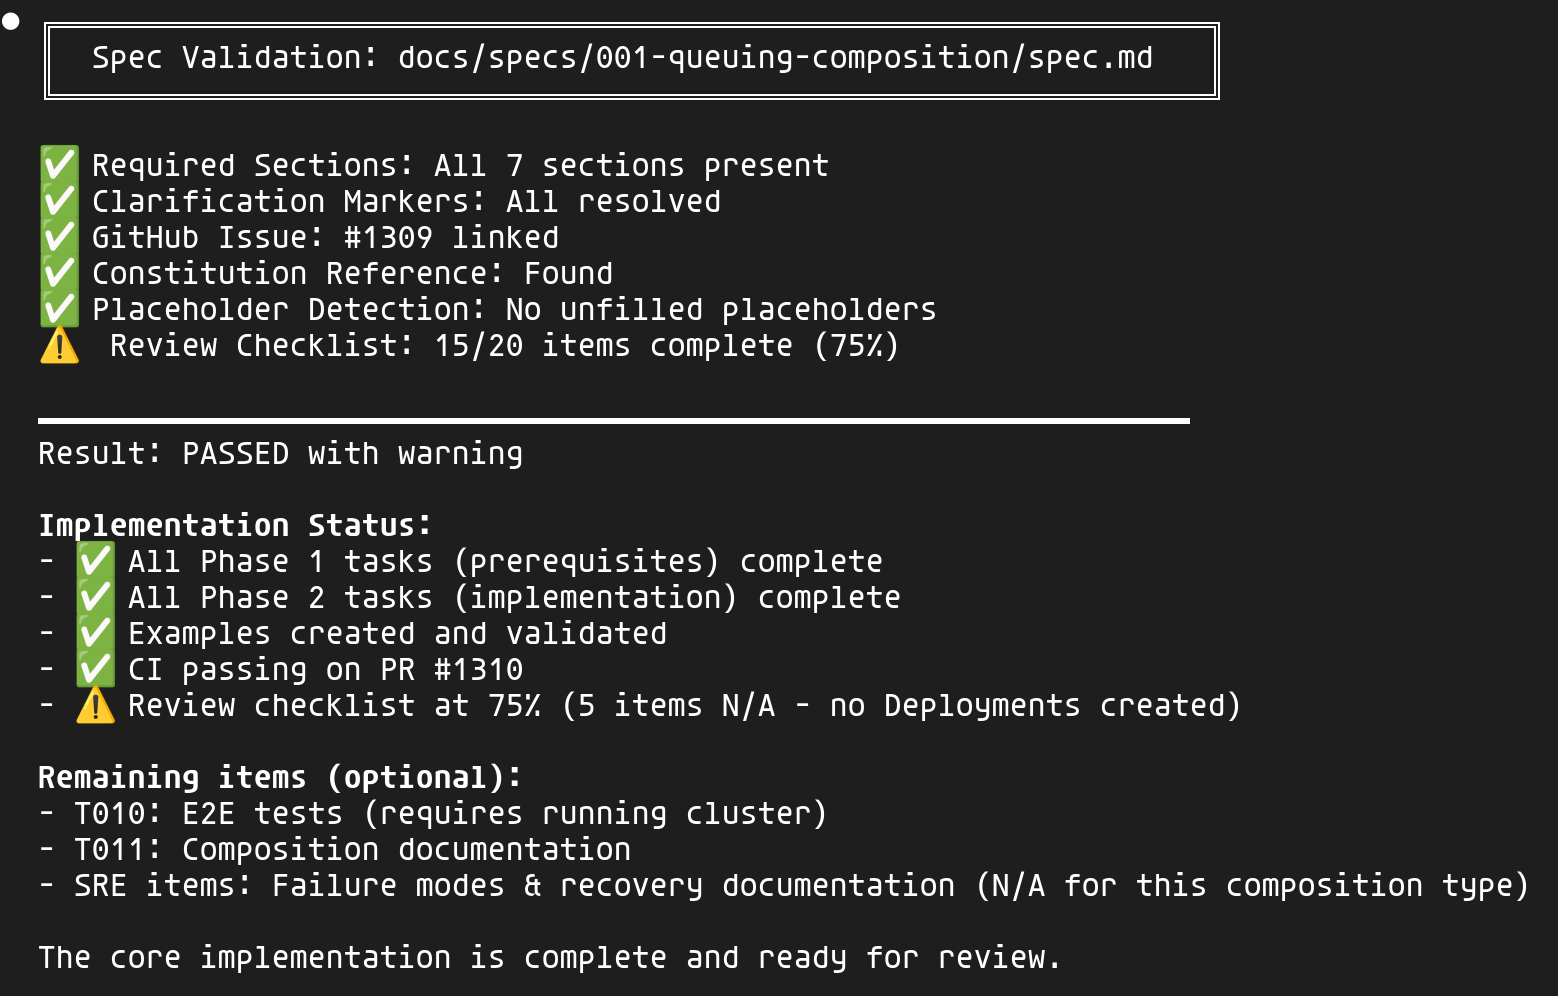
The validation covers:
- Spec: Sections present, clarifications resolved, issue linked
- Implementation: Phases completed, examples created, CI passing
- Review checklist: The 4 personas (PM, Platform Engineer, Security, SRE)
Items marked "N/A" (E2E tests, documentation, failure modes) are clearly identified as optional for this type of composition.
Result: the final user API 🎉
Developers can now declare their needs in just a few lines:
 1apiVersion: cloud.ogenki.io/v1alpha1
 2kind: Queue
 3metadata:
 4  name: orders-queue
 5  namespace: ecommerce
 6spec:
 7  # Kafka for streaming with retention
 8  type: kafka
 9  clusterRef:
10    name: main-kafka
11  config:
12    partitions: 6
13    retentionDays: 7
Or for SQS:
 1apiVersion: cloud.ogenki.io/v1alpha1
 2kind: Queue
 3metadata:
 4  name: notifications-queue
 5  namespace: notifications
 6spec:
 7  # SQS for simple cases
 8  type: sqs
 9  config:
10    visibilityTimeout: 30
11    enableDLQ: true
In both cases, the platform automatically handles:
- Resource creation (Kafka topics or SQS queues)
- Authentication (SASL/SCRAM or IAM)
- Monitoring (metrics exported to VictoriaMetrics)
- Network security (CiliumNetworkPolicy)
- Credential injection into the application's namespace
Without SDD, I would have probably jumped straight into writing the Crossplane composition, without stepping back to take a proper product approach or flesh out the specifications. And even then, delivering this new service would have taken much longer.
By structuring the thinking upfront, every decision is documented and justified before the first line of code. The four perspectives (PM, Platform, Security, SRE) ensure no angle is missed, and the final PR references the spec — the reviewer has all the context they need.
💭 Final thoughts
Through this article, we've explored agentic AI and how its principles can be useful on a daily basis. An agent with access to rich context (CLAUDE.md, skills, MCPs...) can be truly effective: quality results and, above all, impressive speed! The SDD workflow also helps formalize your intent and better guide the agent for more complex projects.
Things to watch out for
That said, as impressive as the results may be, it's important to stay clear-eyed. Here are some lessons I've learned after several months of use:
- Avoid dependency and keep learning — systematically review the specs and generated code, understand why that solution was chosen
- Force yourself to work without AI — I make a point of at least 2 "old school" sessions per week
- Use AI as a teacher — asking it to explain its reasoning and choices is an excellent way to learn
If you work with sensitive or proprietary code:
- Use the Team or Enterprise plan — your data isn't used for training
- Request the Zero-Data-Retention (ZDR) option if needed
- Never use the Free/Pro plan for confidential code
See the privacy documentation for more details.
💡 Getting the most out of it
Tips and workflows I've picked up along the way (CLAUDE.md, hooks, context management, worktrees, plugins...) have been compiled in a dedicated article: A few months with Claude Code: tips and workflows that helped me.
My next steps
This is a concern I share with many developers: what happens if Anthropic changes the rules of the game? This fear actually materialized in early January 2026, when Anthropic blocked without warning access to Claude through third-party tools like OpenCode.
Given my affinity for open source, I'm looking at exploring open alternatives: Mistral Vibe with Devstral 2 (72.2% SWE-bench) and Crush (formerly OpenCode) (multi-provider, local models via Ollama) for instance.
🔖 References
Guides and best practices
- How I Use Every Claude Code Feature — Comprehensive guide by sshh
Spec-Driven Development
- GitHub Spec Kit — GitHub's SDD toolkit
- OpenSpec — Lightweight SDD for brownfield projects
- BMAD Method — Multi-agent SDD
Plugins, Skills and MCPs
- Code-Simplifier — AI code cleanup
- Claude-Mem — Persistent memory across sessions
- CC-DevOps-Skills — 31 ready-to-use DevOps skills
- Awesome Claude Code Plugins — Curated list
Cited studies
- METR Study on AI Productivity — Productivity study
- State of AI Code Quality 2025 — Qodo
- Building Effective Agents — Anthropic Research
Resources
- Cloud Native Ref — My reference repo
- SWE-bench Leaderboards — Reference benchmark